

NetSuite’s saved search feature is a powerful tool that allows you to create customized reports based on your unique criteria. Saved searches can be created for standard record types as well as custom records, and can even use formulas and SQL statements to accommodate more complex criteria or display more dynamic results.
While saved searches can be used for reporting data, they can also be used to trigger automations within NetSuite – both within the search configuration itself and by combining them with workflows for more intricate processes. In this post, I’ll highlight five ways that you can use saved searches to make NetSuite’s built-in case management tool even more efficient and effective.
- Create automated, daily emails that provide details on open cases.
One of the easiest ways to use saved searches from an automation perspective is to enable the email feature. Depending on your needs, emails can be sent as soon as a record enters the results of the search or can be sent according to a schedule. For this search, start by specifying which statuses you would like to include (i.e. “In Progress” and “Not Started”) and then configure the fields that will display within the email on the “Results” tab. For users in a management role, the complete list of open cases can be sent; for users in a support role, results can be limited to include only their cases by adding the criteria “Assigned To = Mine” to the search.
To set up the automated email, use the “Email” tab within the saved search. Check the “Send Emails According to Schedule” and “Summarize Scheduled Emails” checkboxes, then configure the recipients. To define which recipients will receive the email, use the “Specific Recipients” subtab. On the “Customize Message” subtab, enter the desired subject line, from address, and body text. The summarized search results – which display the open cases – can be embedded within the body of the message or attached as a .CSV, Microsoft Excel, or PDF file. Additionally, direct links to the case records can be included in the email if the results are embedded within the message. Finally, use the “Schedule” subtab to define when the email results should be sent. If the results are sent daily, the emails can be limited to only weekdays if desired.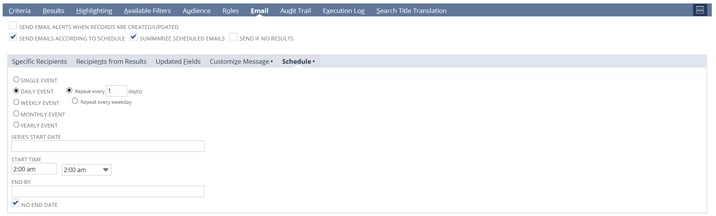
- Automate reminder emails to the user who created the case when support is awaiting their response.
When additional information is required from the user in order to research or resolve a case, there can sometimes be a delay in the process while the support representative awaits a response. To be more proactive in requesting updates, a saved search can be used to trigger an email directly to the user on behalf of the support representative. For the search criteria, use “Awaiting Support Reply = False” to identify cases that need a response. Then, set the “Last Customer Message Received” date to determine how long the case should be awaiting a response before it enters the search and initiates the email. Check the “Send Email Alerts When Records are Created/Updated” checkbox on the “Email” tab to indicate that the email should be sent when it enters the results (as opposed to the scheduled email described above). On the “Recipients from Results” subtab, select “Email” to specify that the resulting email should be sent directly to the user email address listed on the support case. On the “Customize Message” subtab, you can dynamically pull the name and email address of the support representative into the “From” field by entering "{assigned}" <{employee.email}>. Add any desired tags and/or default text in the “Single-Record Results” and “Subject” fields to define the content of the message. Since this message will be triggered as soon as a record enters the search results, you do not need to define any criteria for scheduling the email.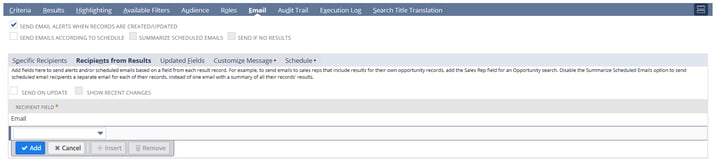
- Generate alert emails for re-opened cases.
Depending on your business processes, you may opt to handle cases that are re-opened with a higher level of priority. One simple way of improving the response time on cases that are re-opened is to use a saved search to auto-generate an email notification to the support manager or other key staff members. Set the criteria to display cases with “Status = Re-Opened” and use similar configurations to those listed above to trigger the email notification upon entry.
- Customize the way that cases are displayed on your dashboard for better visibility.
Saved searches can be added to your dashboard, allowing you to have customized at-a-glance reporting on your case management system. To make a saved search available for use on your dashboard, select the “Available as Dashboard View” option when creating the search. Use your own unique criteria to define which records will display on your dashboard (i.e. all open cases, only cases that have been escalated, cases that are awaiting support reply, etc.), then define which columns you want to include as part of your dashboard. For even faster response to open cases, you can opt to include user contact information or additional case notes directly within the search so that you can begin your outreach without even opening the case record. Furthermore, search results can be color-coded by configuring the “Highlighting” tab. This is especially helpful for indicating high-priority cases, such as those that have been awaiting a response for more than one day, since highlighting them will draw extra attention to them on your dashboard. To make the dashboard view even more dynamic, consider adding filters on the “Available Filters” tab. Filters allow you to further refine the results displayed as part of the search – including limiting results to a specific support representative or date range – without requiring any changes to the search itself.
- Use a workflow to automatically escalate high-value customers.
In some businesses, there may be the need to prioritize the cases of certain customers based on sales volume, purchase history, or some other unique criteria. In those instances, a saved search can be used to initiate a workflow that sets the value of the “Status” field (or any other custom field that is used to define case priority within your organization). Starting from a “Saved Case Search,” set the search criteria using joins to access any desired details from the customer’s account or from transactional records. If using summarized values, use the “Summary” subtab of the search criteria to specify the minimum or maximum values that should be included within results (i.e. number of orders, sum of all transactions, etc.). Once the search is configured to pull the target group of customers, use it to initiate a workflow on cases that will trigger the “Set Field Value” action to populate the desired field(s) with your selected value.
When managing support cases, the key to customer satisfaction is your organization’s ability to provide fast, proactive support without adding manual work for your support staff. By using saved searches within NetSuite to automate notifications, improve case visibility, and prioritize cases more effectively, you empower support representatives and allow them to become more efficient – all while using native NetSuite functionality and without the need for custom development or third-party integrations.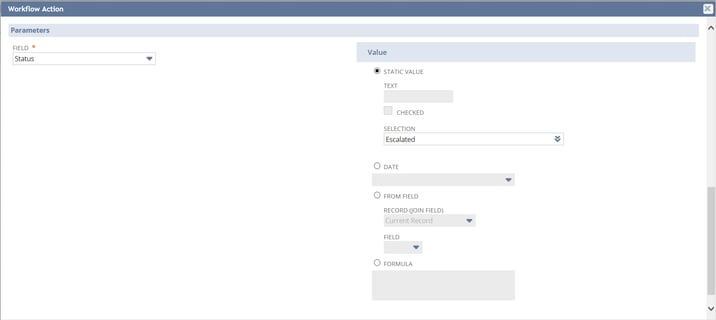
If you are still running into issues, we can help! Our team offers a variety of training and support packages to help you get the most out of your NetSuite investment.

