

Having trouble with the error: “Ambiguity error on logical key multi-match”? This article helps you to add multiple line items with the same item on a transaction via CSV Import or you would like to add new line items to existing transactions using CSV file uploads.
When you need to update existing transaction records through CSV import, you might have encountered the error: “Ambiguity error on logical key multi-match”. It could confuse you when you insert a new line in an already existing transaction, such as a sales order (opportunity, estimate, quote, return authorization, invoice, credit memo) or purchase order (vendor bill).
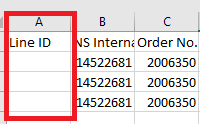
Typically, you would use Line ID to help you key on and reference specific transaction lines. The MUST action item is to leave the Line ID blank (null) during your CSV Update so that NetSuite acknowledge this as a new line insert request. You will need to add the blank column (field) to your CSV upload so that you can assign the NetSuite’s Item Line ID as null.
For example, you want to add the line items to an existing sales order via CSV import. Also, you have the same line items multiple times.
- The Sales Order has the following items:
-
- Item A - Quantity 10
- Item B - Quantity 20
-
- User wants to update the Sales Order to:
-
- Item A - Quantity 10
- Item B - Quantity 20
- Item A - Quantity 10
- Item A - Quantity 20
-
- Steps to update the example transaction:
-
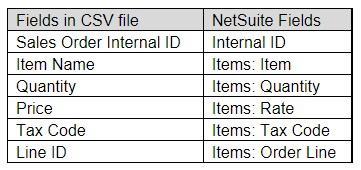
- Create a CSV file that has the Line ID column. Set the column value as blank.
-
- Sales Order's Internal ID
- Item Name
- Quantity
- Price
- Tax Code
- Line ID
-
- Navigate to Setup > Import/Export > Import CSV Records.
- Select Transactions in the Import Type field.
- Select the transaction type in the Record Type field: Sales Order.
- Click Select.
- Locate the CSV file then click Open.
- Click Next.
- Select Update for Data Handling.
- Click Next.
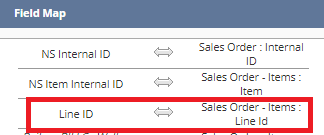
- In the Field Mapping:
- Click Next.
- Provide an Import Map Name.
- Click Save & Run.
- Create a CSV file that has the Line ID column. Set the column value as blank.
-
This completes the upload. To share my experience, I uploaded the same line items via CSV import. Using the above example, I uploaded “b) 4. Item A - Quantity 20”. I will also briefly show you how to remove specific line item(s) in a Sales Order through a CSV Import.
- Create a CSV Import File with the following columns/values:
-
- Sales Order Internal ID
- Item Line ID (Refers to all Line Items to be retained)
-
- You may create a Sales Order Transaction Saved Search to pull up above fields.
-
- Lists > Search > Saved Searches > New.
- Click on Transaction link.
- Under Criteria tab > Standard subtab, add the following fields:
-
- Type = is Sales Order
- Main Line = is false
- Tax Line = is false
- Shipping Line = is false
-
- Under Results tab > Columns subtab > Add the following filters:
-
- Internal ID
- Line ID
-
- Edit the Search Title as desired
- Click Save & Run.
- Click Export - CSV button to export the file.
- Modify the exported file to only show the row(s) referencing to the Item Line ID(s) to be retained after the import.
-
- Navigate to Setup > Import/Export > Import CSV Records.
-
- Scan & Upload CSV File
-
- Import Type = Transactions
- Record Type = Sales Order
- Charter Encoding = Western (Windows 1252)
- Select One file to Upload
-
- Import Options
-
- Data Handling = Update
- Under Advanced Options > Overwrite Sublists = TRUE
- Click Next.
-
- Field Mapping
-
- Internal ID = Internal ID (Could be found under the Sales Order folder)
- Line ID = Item: Line ID (Could be found under the Sales Order Items folder)
-
- Click Next
- Enter an Import Map Name.
- Click & Save Run.
- Scan & Upload CSV File
-
Note: It is highly suggested to update one sales order record first to check on the result and for testing purposes
If you want to learn more about NetSuite CSV import or need help with Saved Search, please contact Concentrus today to discuss your needs.
About Us
Concentrus is a complete NetSuite solutions provider that guides organizations through how to use NetSuite to reach highly focused business goals and objectives. We provide NetSuite implementation, developer, integration, and customization services to ensure that you have a long-term solution that is tailored to fit your systems, people, and processes.
Read About Our Implementation Methodology
Want more NetSuite Tips and Tricks? Check out our Short & 'Suite videos
