

While most NetSuite instances that I encounter make good use of custom fields, custom forms, and custom subtabs, one of the custom configuration options that I don’t see enough organizations taking advantage of is custom sublists. Custom sublists are groupings of data from either standard or custom records under a parent record. Examples of standard sublists include the Transactions list on the customer record, the Related Records list on transactions, and User Notes on an item record. In this post, I’m going to cover the basics of creating a custom sublist and applying it to a record as well as share a few practical examples of custom sublists that I’ve seen.
Creating a Custom Sublist
You can create a custom sublist using a saved search or by designating a parent record on a custom record. Let’s start with the saved search method. For this example, I’ll be creating a sublist to display past due invoices on a customer record. I’ll start by defining my criteria, just as I would with a typical saved search. Note: If you’re new to saved searches, be sure to take a look at our previous blog posts covering saved search functionality in more detail.
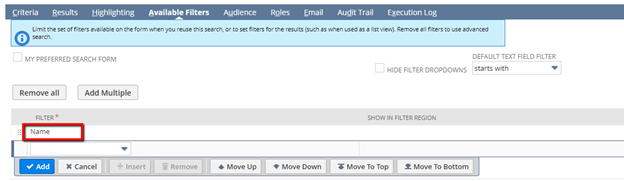
It’s important to call out two header-level options that must be selected in order for your saved search to properly function as a sublist – Public and Available as a Sublist View. Users must have access to the search in order to see the sublist data (hence the “Public” option) and only saved searches designated as Available as Sublist View will be available for selection as sublists. If you would prefer to limit your sublist to only a particular set of users or roles, you can leave Public unchecked and configure this on the Audience subtab instead.

On the Results subtab, define the columns that you want to see on your custom sublist as well as the default sorting order.

Finally, you must configure a filter that will be used to segment the sublist data based on the correct value. In this example, we want to see overdue invoices segmented by customer, so we’ll use Name as our filter.
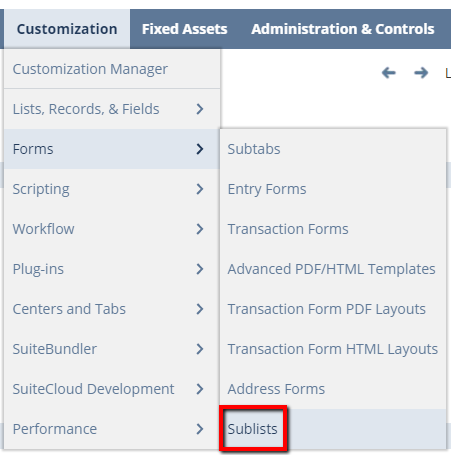
Now that my saved search has been built, I can expose the results as a sublist on the customer record. You can create a custom subtab to expose your sublist on, but I’ll be adding it to the standard Sales subtab on the customer record for this example. Navigate to Customization > Forms > Sublists.
On this screen, you’ll configure which records your custom sublist is exposed on, which tab it will appear under, and how it is labeled.

I’ve designated that my saved search (“Past Due Invoices”) will appear on the customer record, under the sales subtab, with the label “Past Due Invoices.” Now that I’ve set up my custom sublist, I can see how it displays by navigating to the Sales subtab on my customer record:
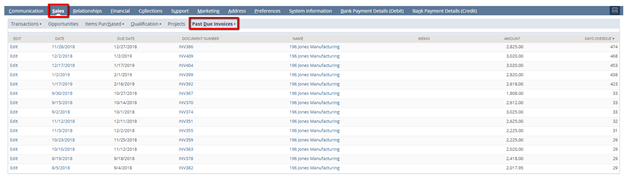
As you can see in the screenshot above, the list of invoices has been limited to only those associated with the customer record that I am on, which is due to the filter that was added in my saved search.
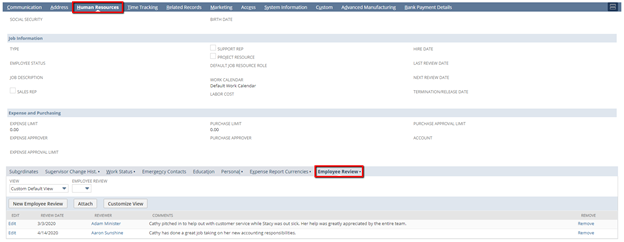
Next, let’s configure a custom record to display as a sublist by using the parent record setting. For this example, I’m going to create a custom record for entering employee reviews that will be displayed on the Human Resources subtab of the employee record. I won’t go into detail on the creation of the custom record, but be sure to read our blog post “How to Use Custom Record Types in NetSuite” (http://blog.concentrus.com/how-to-use-custom-record-types-in-netsuite) if you’re new to creating custom records.
Once you’ve set up your custom record, you’ll need to define which field on the custom record is the parent. The field type must be List/Record in order to allow the “Record is Parent” checkbox to be checked. In the case of my employee review example, the employee record will be my parent, since that is where I want to be able to view the sublist of reviews submitted for a particular employee. Once the Record is Parent checkbox has been checked, I can define the Parent Subtab where the sublist will be displayed.
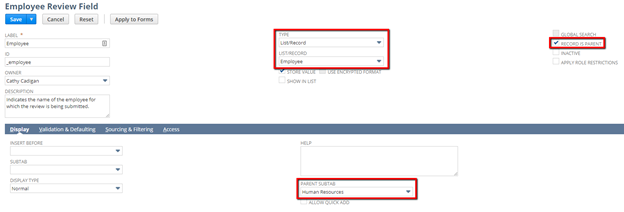
When working with custom records, you can quickly set up a sublist by tagging a parent record. Following only the configuration changes shown in the screenshot above, I’m now able to see my employee reviews as a sublist under the Human Resources subtab.655555555555555555555555555555555555555555555555555555555
Practical Applications for Custom Sublists
Here are just a few of the ways that I’ve seen custom sublists used:
- Peer reviews by employee (similar to the employee review example above)
- Items by vendor (vendor record)
- Open sales orders by item (item record)
- Open purchase orders by item (item record)
- Contracts by customer (customer record)
- Returned items by customer (customer record)
- Warranties by customer (customer record)
Once you get comfortable with the basics of configuring custom sublists, you’ll likely find a plethora of opportunities for improving visibility into specific subsets of data through custom sublists. Do you want to learn more about creating custom sublists in NetSuite, or get guided support or training? Contact Concentrus today to discuss your custom sublist needs.
