
 One of the most under-utilized customization options available within NetSuite is custom records. In fact, the customization-related question that I have heard from users more than any other is “what do people use custom records for?” Although custom records are native NetSuite functionality, many seasoned users haven’t created any and can’t really envision any practical applications for them, especially since NetSuite has such a vast array of standard record types and fields already available. In this post, we’ll take a closer look at the basic functionality and structure of custom records, and we’ll review some real-world applications to help give you some inspiration for ways you can use custom records in your NetSuite environment.
Custom Record Basics
Navigate to Customization > Lists, Records, & Fields > Record Types to see a list of existing custom records in your system. Many bundles and integrations use custom records to support their functionality, so you will likely see custom records already in existence within your environment even if no one on your team has personally created them.
To create a new custom record, you can either click the “New Type” button on the page that displays existing custom records or you can navigate to Customization > Lists, Records, & Fields > Record Types > New. This will open a new Custom Record Type user interface that will allow you to define all of the settings related to your custom record, include record name, access, fields, subtabs, and other general preferences.
Note: For the purposes of providing a high-level overview for this blog post, we will not be reviewing all of the available configuration options. For more detailed information, view SuiteAnswers article ID 10140 (Creating Custom Record Types), click the Help link on the Custom Record Type page, or click on any of the field names for specific field help.
Below is a screenshot of the Custom Record Type user interface:
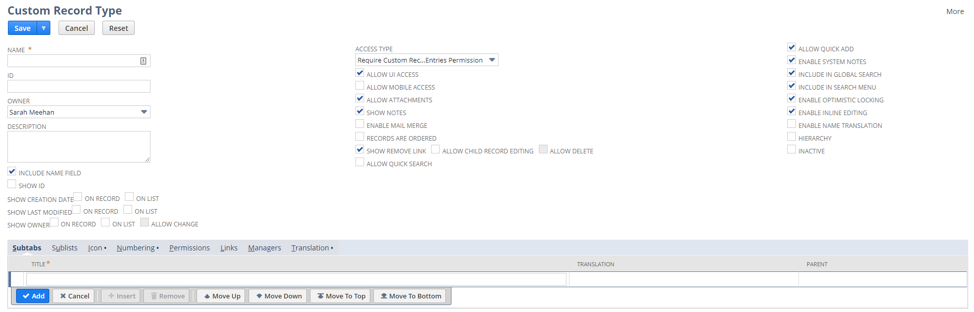
As you can see, there are quite a few options available to you when you’re creating a new custom record type – we’ll be focusing on the most common settings in this post.
- Name – This is the name that will be used to refer to the custom record that you are creating. The value entered in this field will be displayed at the header when viewing/entering new custom records of this type as well as on saved searches and CSV imports.
- ID – Similar to the ID on custom fields, saved searches, and scripts in NetSuite, this field allows you to enter an ID that can be used to reference this record in scripts or formulas. The value entered here will be prepended with customrecord, so it is recommended that you start your ID with an underscore (“_”).
- Description – This is an optional field that allows you to enter information about the purpose of this record and how it is being used within the system.
- Show Creation Date/Show Last Modified/Show Owner – These settings each have two options – On Record and On List. You can select one, both, or neither for each of the three settings. These settings allow you to display information about who created a record, when they created it, and the date when it was last updated. On Record indicates that it will be shown on the custom record itself, while On List will only show when viewing a list of all records of this custom record type.
- Access Type – This defines how you grant user access to the custom record. There are three options:
- Require Custom Record Entries Permission – Permission is granted within the role itself, similar to other permissions in NetSuite
- Use Permission List – Permission levels are set on the Permissions subtab on the custom record
- No Permission Required – All users can access the custom record without any permission changes
- Include in Global Search – This preference indicates whether this custom record type will be searchable using the Global Search feature.
Additionally, you can define Subtabs, Sublists, Numbering, and other preferences on the subtabs located at the bottom of the custom record type UI. You may have noticed that there is no option to add fields onto the custom record type in the screenshot shown above. When initially creating a new custom record type, you are not able to define a field list, however this functionality becomes available after the custom record type is saved. Similarly, you will also see options to create custom forms, view system notes, and review related parent/child records after the initial save.

Adding Fields to Custom Record Types
To add a new field, click the “New Field” button on the Fields subtab on the custom record type UI. This will load a new screen that looks almost identical to the custom field interface for standard record types:
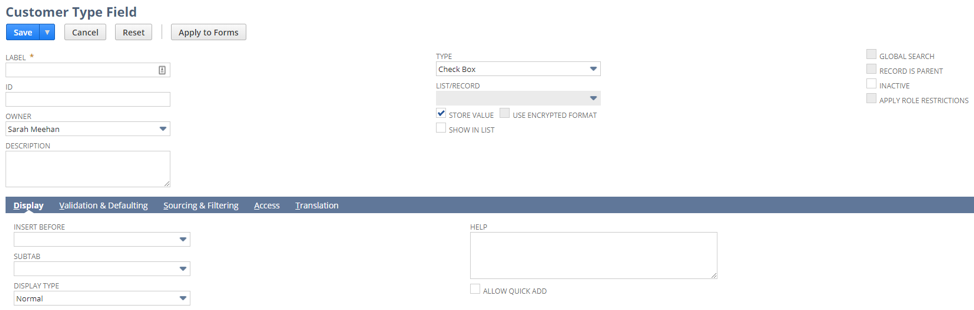
Complete this form for each custom field that you want to add to your new custom record type. As with custom fields on standard record types, you can select from a variety of field types and use formulas or source from related records to automatically set custom field values.
Parent Records
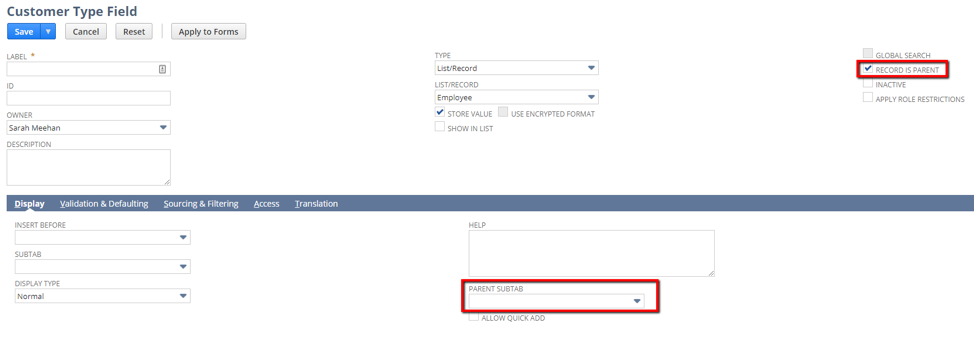
In some instances, your custom record types will be created to capture stand-alone information that is unrelated to any existing record within NetSuite. However, most custom record types have a parent record to which the custom record is related. Examples of this relationship include performance reviews associated with employees or product installation records associated with a customer.
To define an existing record type (either standard or custom) as a parent of the new custom record type, you must create a field of the List/Record type that points to the associated record. Once you select the List/Record that you would like the field to reference, click the Record is Parent checkbox to indicate that the value entered in this field on the custom record type will act as the parent. You can also specify which subtab on the parent record will be used to display associated custom records by selecting a Parent Subtab value.
Once you have defined all of the fields and set a parent if desired, you can add subtabs and create custom forms for the users who will be accessing the custom record type that you have just created. Detailed information on these topics is available in SuiteAnswers or by clicking the Help link on the custom record type page.
Practical Applications for Custom Record Types
Now that we’ve walked through the basics of creating custom record types, I’d like to share just a few of the ways that I’ve seen them effectively used:
- Collecting peer reviews on employee records
- Recording product installations on customer records
- Attaching extended warranty registration information to sales orders
- Documenting change orders on project records
- Adding gift recipient details (i.e. relationship type and birthday) onto a customer record for marketing purposes
- Associating versioned marketing materials and product manuals with an item record
- Creating a collection record attached to an invoice that will allow for estimated receivables forecasting based on customer-provided payment date
- Documenting process steps for each manufacturing workstation and attaching them to an assembly item record
Want to learn more about creating custom record types in NetSuite, or get guided support on creating one of the custom records described in this post? Contact Concentrus today to discuss your reporting needs.