
 The ability to quickly and easily create custom fields in a variety of types in order to meet unique business requirements is one of the things that sets NetSuite apart from other ERP platforms. In addition to creating checkboxes, open text fields, and date fields, NetSuite also allows users to source custom lists or existing records as drop-down lists using the “List/Record” field type. In some cases, it is beneficial to give users the ability to select from all available values within the drop-down field. At times, you may only want to expose a specific sub-set of data in the drop-down list in order to prevent mismatches and make it easier for users to the desired value. By taking advantage of the Sourcing & Filtering options, you can limit the available values in a List/Record field to only those that apply at the time of entry. In this blog, I’ll walk through setting up the Sourcing & Filtering options to create dynamic drop-down fields and share a few practical examples of using this functionality.
List/Record Field Basics
For the purposes of this post, I’m going to focus only on List/Record fields. If you’d like more information on other custom field types or need a basic overview of creating custom fields, see SuiteAnswers articles Kinds of Custom Fields (ID 10092) and Creating a Custom Field (ID 10078).
If you will be using a custom record or custom list as the source for your List/Record field, start by creating the custom record or custom list before creating the custom field. Note: You do not have to create all custom records or custom list values prior to creating the custom field, as these can be added or updated after the field has been created.
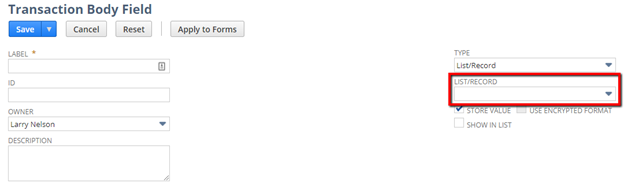
In the custom field UI, select List/Record in the Type field. This will expose the List/Record field immediately beneath it, which will allow you to select from standard record types and lists as well as existing custom records and custom lists to act as the source data for this field.
If you will be sourcing from a standard record type, then you should select the top-level record type (i.e. Customer or Transaction) instead of a sub-record (i.e. Lead or Invoice), just as you would when creating a saved search. You will have the ability to filter down to a particular sub-record type on the Sourcing & Filtering subtab.
Souring & Filtering Options
Once you’ve defined the List/Record for your custom field, you can then begin setting up your dynamic sourcing criteria on the Sourcing & Filtering subtab.

There are three fields on this subtab, in addition to a sublist that will allow you to set up additional conditional criteria (similar to setting up a saved search).
- Source List – This defines which field references the record that will act as the source for your field’s value. This is used in passing a value from another linked record into a custom field, such as displaying the sales rep’s email. In that example, the Source List would be Sales Rep.
- Source From – This indicates which field within the record selected as the Source List will act as the source for the custom field’s value. Continuing with the example above, the Source From would be Email, and the end result would be that the email address from the sales rep’s employee record would be displayed. Note: The selected field must match the type of the custom field that is being created. If the custom field is a List/Record field, then it can only source from other List/Record fields that pull from the same List/Record.
- Source Filter By – This field allows you to define the parameter that will be used to filter the List/Record values that will be available to users. As an example, limiting a field that was sourcing transaction records to only display transactions associated with the selected customer, you would select Entity as your Source List and Entity as your Source Filter By value. This tells NetSuite to look to the Entity value on the Entity record and only display transactions for that Entity. Note: The Source Filter By field must be in the record selected in the List/Record field. In this example, the Entity field has to exist on the Transaction record in order to filter correctly.
For basic filtering, such as transactions by customer (described above), you only really need to set up the Source List and Source Filter By fields in order to display dynamic values in your custom field.


For more complex filtering capabilities, you’ll want to leverage both the header-level fields as well as additional criteria lines in the sublist. Continuing with the example above, let’s say that you don’t want to see all transactions by a specific customer, but instead only want to see their invoices. In that case, you can add a line that sets the Filter Using to Type and the Value Is set to Invoice:
Extending this logic even further, let’s only look at invoices that are not paid in full by using Status not equal to Invoice:Paid In Full:
If you have spent time creating saved searches, then this interface should feel familiar as it is very similar to the interface used for defining saved search criteria. Just like with saved searches, a record must meet all criteria in order to be displayed as an option in the drop-down list. In the example above, a transaction must have the same entity (set using Source List and Source Filter By), must be an invoice (set on the first sublist line), and must not be paid in full (set on the second sublist line). If it does not match any of these criteria, then it will not be displayed within the list.
In the screenshots above, you’ll notice other columns for Is Checked (used when the Filter Using field is a checkbox), Is Not Empty (used to indicate that a field must have any value), and Is Empty (used to indicate that a field must be empty). Additionally, you can define a Compare To Field, which use the value in the specified field for determining matching criteria instead of the Value Is column. For example, if you only wanted to display invoices that had the same Approval Status as the transaction being entered, you could use the Compare To Field as follows:

This same logic could be used to only show transactions with the same sales rep as listed on the transaction where the custom field is being displayed or to exclude transactions that have the same PO number – the options are limitless!
Multiple Dependent Lists
For many business requirements, the above options will be sufficient to build out the necessary logic. There are some scenarios, however, that need some more advanced configuration – particularly cases where the value of one field needs to adjust based on the values selected in two other fields. As an example, let’s consider a customizable product line that is available for sale and allows customers to select a font face and a Font Color. Only certain Product Types within the product line are eligible to be customized using some of the font faces due to the material that they are made with and some of the Font Colors are not available with certain font faces, so it’s important that the list of font faces is limited to only those that are available with the selected Product Type and Font Color.
To achieve this, you can create a custom record that includes fields for Product Type and Font Color, using the same custom lists that will be used for the custom fields on the transaction record. For this example, we’ll refer to this custom record as “Font Option.” You will create a custom record that pertains to each available combination (i.e. Blue Arial on Ceramic and Blue Arial on Canvas), specifying the Product Type (ceramic or canvas) and the Font Color (blue) in the custom fields on the Font Option record.
Then, create a Font Option field on the line level that is sourcing from the Font Option custom record. On the Sourcing & Filtering tab, set the sublist values as follows:
- Filter Using: Product Type equal Compare To Field: Product Type
- Filter Using: Font Color equal Compare To Field: Font Color
This tells NetSuite to only display values where the line-level Product Type is the same as the Product Type on the Font Option custom record AND the line-level Font Color is the same as the Font Color on the Font Option custom record.
For a more detailed overview of this process, be sure to read the SuiteAnswers article Multiple Dependent Dropdown Lists (ID 10093).
Practical Applications for Dynamic List/Record Fields
Now that we’ve walked through the basics of creating custom List/Record fields with dynamically-sourced values, I’d like to share just a few of the ways that I’ve seen them effectively used:
- Display a list of invoices associated with the selected customer on a custom record used to track product installation or customization
- Use a custom field on the employee record to identify employees who are installers, and display only those employees in a field on the sales order
- Use a checkbox on sales orders to identify when they include a product that requires customization and display only those sales orders on a custom record that is used to track customized products
- Create a list of employees eligible for review for display on an online peer review form
- For organizations that have military customers, display lists of divisions and ranks on the customer record based on the military branch selected
- Display the original sales order number on a sales order created to send a replacement shipment to the same customer
Want to learn more about creating dynamic List/Record fields in NetSuite, or get guided support on creating one of the fields described in this post? Contact Concentrus today to discuss your needs.