

Is your Income Statement in need of a face lift? If you are not able to over-haul your Chart of Accounts, you can update your Income Statement Layout directly in NetSuite. I will walk you through some steps that will consolidate the GL accounts on your Income Statement. From this walk through, you should have enough information for you to customize your own report.
First, let’s open a native NetSuite Income Statement.
-
-
- Navigate to > Reports > Financial > Income Statement
-
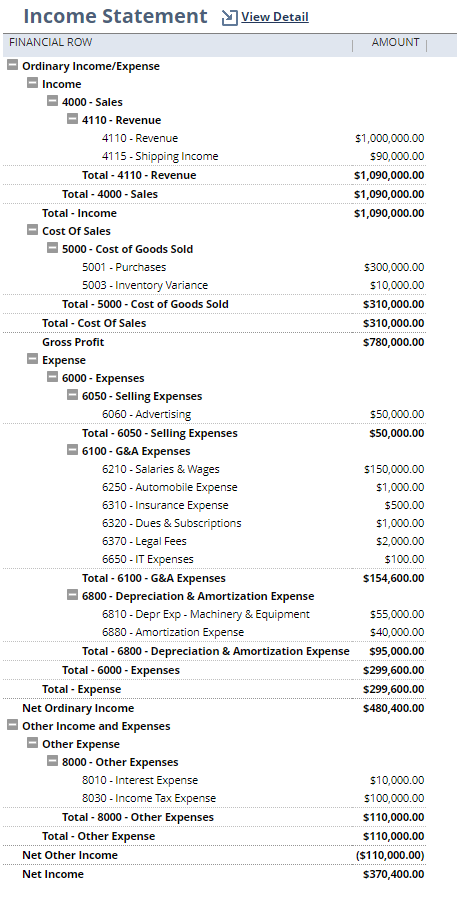
- Before I make any customizations, in my example, my Income Statement looks like the below:
-
- Navigate to > Reports > Financial > Income Statement
-
-
-
-
-
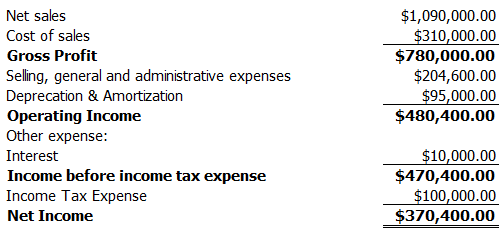
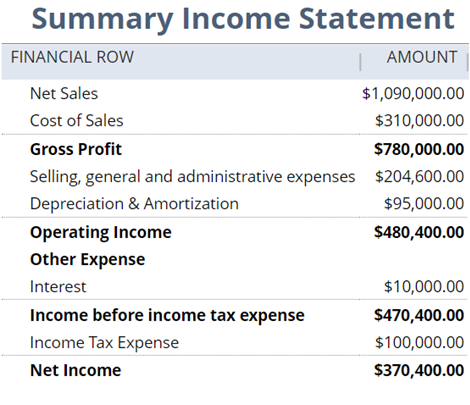
- What I will try to accomplish is a simpler Income Statement that will end up looking closer to this format:
-
-
-
-
-
- On your Income Statement, click Customize
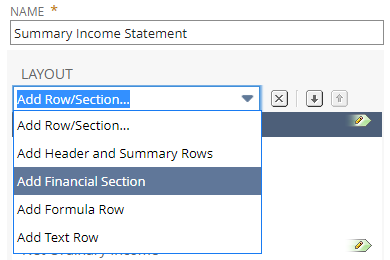
- Enter a new name for your report. In my example, I named it “Summary Income Statement”
- Then click Save
- Click “Return to Customization” button
Note: On the Edit Layout Tab you will see 2 sections:-
- The LAYOUT which is on the left and
- The settings for each row on the LAYOUT
-
-
- On the left section (LAYOUT)
-
- Using the Dropdown, select Add Financial Section
- Using the Dropdown, select Add Financial Section
-
- On the left section (LAYOUT)
-
-
-
-
-
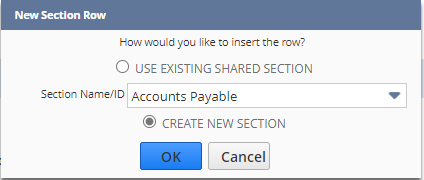
- On the pop-up box select CREATE NEW SECTION then click OK
-
-
-
-
-
-
-
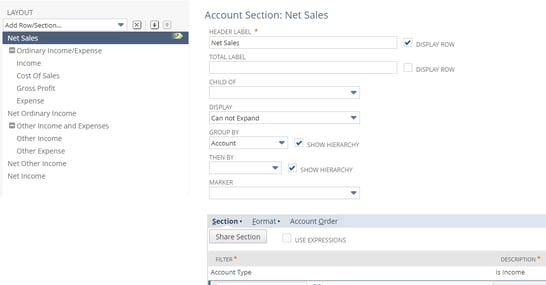
- On the HEADER LABEL enter Net Sales
- On the TOTAL LABEL, uncheck the DISPLAY ROW
- On the DISPLAY, change to Can not Expand
- On the Section sub-tab, add Account Type filter, and select Income
- The Net Sales section should look like this below:
-
-
-
-
-
- On the left section (LAYOUT)
-
- Using the Dropdown, select Add Financial Section
- On the pop-up box select CREATE NEW SECTION then click OK
- On the HEADER LABEL enter Cost of Sales
- On the TOTAL LABEL, uncheck the DISPLAY ROW
- On the DISPLAY, change to Can not Expand
- On the Section sub-tab, add Account Type filter, and select Cost of Goods Sold
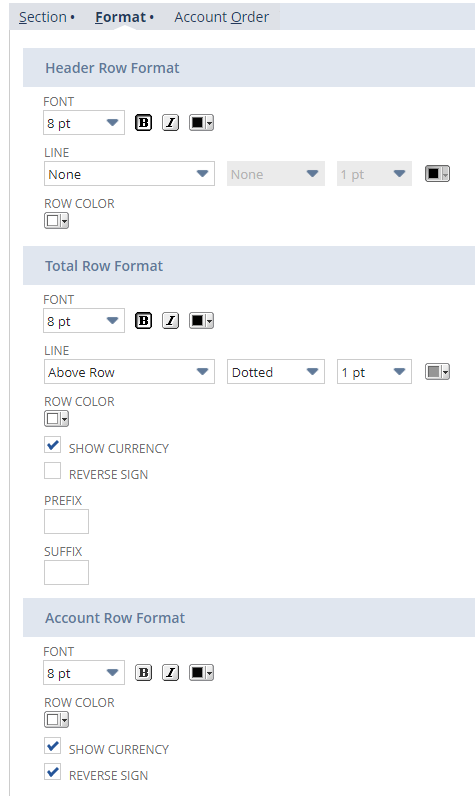
- Select the Format sub-tab, and then select REVERSE SIGN on the Account Row Format Sub-section
-
- On the left section (LAYOUT)
-
-
-
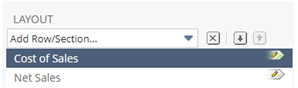
- If your Cost of Sales section is above Sales, drag the Cost of Sales below Net Sales
 →
→ 
-
-
- On the left section (LAYOUT)
-
- Select Ordinary Income/Expense (selecting this to insert above) then
- Using the Dropdown, select Add Formula Row
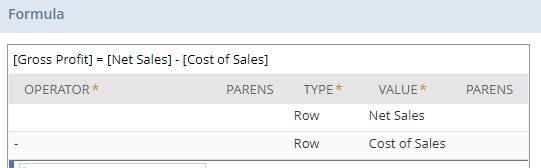
- On the FORMULA LABEL enter Gross Profit
- On the Formula section – First Row:
-
- On Type Column, select Row
- On Value Column, select Net Sales
- Click OK
-
- On the Formula section – Second Row:
-
- On Operator, select the minus sign (-)
- On Type Column, select Row
- On Value Column, select Cost of Sales
-
-
- On the left section (LAYOUT)
-
-
-
- On the left section (LAYOUT)
-
- Select Ordinary Income/Expense (selecting this to insert above) then
- Using the Dropdown, select Add Financial Section
- On the pop-up box select CREATE NEW SECTION then click OK
- On the HEADER LABEL enter Selling, general and administrative expenses
- On the TOTAL LABEL, uncheck the DISPLAY ROW
- On the DISPLAY, change to Can not Expand
- On the Section sub-tab (there will be more than one filter:
-
- Add Account Type filter and select is Expense
- Note: On the next filters, your account #’s will be different from my example. Select your account #’s that are related to Interest, Depreciation, Amortization and Income Taxes to Exclude
- On my example only:
-
- Add Account Number and select is not 6810
- Add Account Number and select is not 6880
- Add Account Number and select is not 8010
- Add Account Number and select is not 8030
-
-
- Select the Format sub-tab, and then select REVERSE SIGN on the Account Row Format Sub-section
-
- On the left section (LAYOUT)
-
-
-
- On the left section (LAYOUT)
-
- Select Ordinary Income/Expense (selecting this to insert above) then
- Using the Dropdown, select Add Financial Section
- On the pop-up box select CREATE NEW SECTION then click OK
- On the HEADER LABEL enter Depreciation & Amortization
- On the TOTAL LABEL, uncheck the DISPLAY ROW
- On the DISPLAY, change to Can not Expand
- On the Section sub-tab (there will be more than one filter:
-
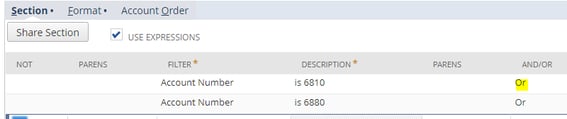
- Select USE EXPRESSIONS. Use Or expression when you want to include more than one account.
- Note: On the next filters, your account #’s will be different from my example. Select your account #’s that are related to Depreciation and Amortization
- On my example only:
-
- Add Account Number and select is 6810
-
- Then change expression to Or
-
- Add Account Number and select is 6880
- Add Account Number and select is 6810
-
-
-
- On the left section (LAYOUT)
-
-
-
-
-
- Select the Format sub-tab, and then select REVERSE SIGN on the Account Row Format Sub-section
-
-
-
- On the left section (LAYOUT)
-
- Select Ordinary Income/Expense (selecting this to insert above) then
- Using the Dropdown, select Add Formula Row
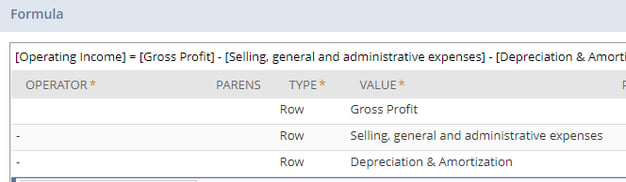
- On the FORMULA LABEL enter Operating Income
- On the Formula section – First Row:
-
- On Type Column, select Row
- On Value Column, select Gross Profit
- Click OK
-
- On the Formula section – Second Row:
-
- On Operator, select the minus sign (-)
- On Type Column, select Row
- On Value Column, select Selling, general and administrative expenses
- Click OK
-
- On the Formula section – Third Row:
-
- On Operator, select the minus sign (-)
- On Type Column, select Row
- On Value Column, select Depreciation & Amortization
- Click OK
-
-
- On the left section (LAYOUT)
-
-
-
- On the left section (LAYOUT)
-
- Select Ordinary Income/Expense (selecting this to insert above) then
- Using the Dropdown, select Add Text Row
- On the TEXT field enter Other expense
-
- On the left section (LAYOUT)
-
- On the left section (LAYOUT)
-
- Select Ordinary Income/Expense (selecting this to insert above) then
- Using the Dropdown, select Add Financial Section
- On the pop-up box select CREATE NEW SECTION then click OK
- On the HEADER LABEL enter Interest
- On the TOTAL LABEL, uncheck the DISPLAY ROW
- On the DISPLAY, change to Can not Expand
- On the Section sub-tab (there will be more than one filter:
-
- Note: On the next filters, your account #’s will be different from my example. Select your account #’s that are related to Interest
- On my example only:
-
- Add Account Number and select is 8010
-
-
- Select the Format sub-tab, and then select REVERSE SIGN on the Account Row Format Sub-section
-
- Note above: Only Reverse the sign if the interest is an Expense type or Other Expense Type. Do not mix Other Expense with Other Income Types
-
-
- On the left section (LAYOUT)
-
-
-
- On the left section (LAYOUT)
-
- Select Ordinary Income/Expense (selecting this to insert above) then
- Using the Dropdown, select Add Formula Row
- On the FORMULA LABEL enter Income before income tax expense
- On the Formula section – First Row:
-
- On Type Column, select Row
- On Value Column, select Operating Income
- Click OK
-
- On the Formula section – Second Row:
-
- On Operator, select the minus sign (-)
- On Type Column, select Row
- On Value Column, select Interest
- Click OK
-
-
- On the left section (LAYOUT)
-
-
-
- On the left section (LAYOUT)
-
- Select Ordinary Income/Expense (selecting this to insert above) then
- Using the Dropdown, select Add Financial Section
- On the pop-up box select CREATE NEW SECTION then click OK
- On the HEADER LABEL enter Income Tax Expense
- On the TOTAL LABEL, uncheck the DISPLAY ROW
- On the DISPLAY, change to Can not Expand
- On the Section sub-tab (there will be more than one filter:
-
- Note: On the next filters, your account #’s will be different from my example. Select your account #’s that are related to Income taxes
- On my example only:
-
- Add Account Number and select is 8030
-
-
- Select the Format sub-tab, and then select REVERSE SIGN on the Account Row Format Sub-section
-
- Note above: Only Reverse the sign if the interest is an Expense type or Other Expense Type. Do not mix Other Expense with Other Income Types
-
-
- On the left section (LAYOUT)
-
-
-
- On the left section (LAYOUT)
-
- Select Ordinary Income/Expense (selecting this to insert above) then
- Using the Dropdown, select Add Formula Row
- On the FORMULA LABEL enter Net Income
- On the Formula section – First Row:
-
- On Type Column, select Row
- On Value Column, select Income before income tax expense
- Click OK
-
- On the Formula section – Second Row:
-
- On Operator, select the minus sign (-)
- On Type Column, select Row
- On Value Column, select Income Tax Expense
- Click OK
-
-
- Click Save
- On the left section (LAYOUT)
-
Your Income Statement should look similar to this:
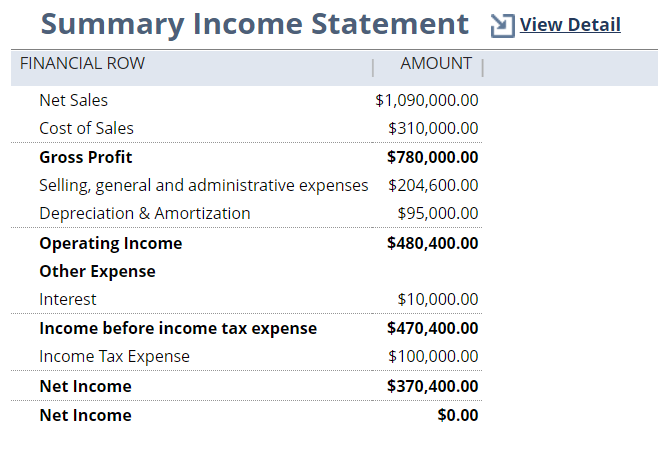
You will notice there are 2 Net Income’s. That is because we did not remove any of the original layouts from the standard Income Statement. I find this to be a good way to ensure all accounts are not missing in your custom layout.
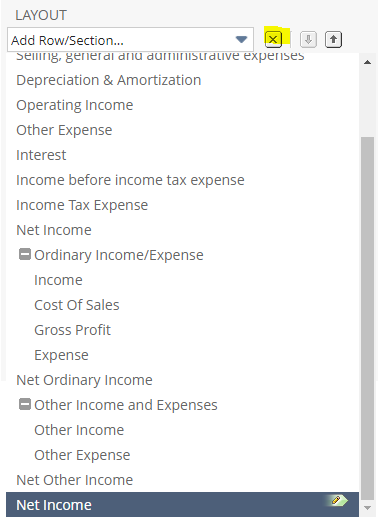
Let’s remove the last Net Income.
-
-
- Go back to Return to Customization
- On the left section (LAYOUT)
-
- Find the last Net Income section and select it.
- Next click on the “X”. It is next to the Add Row/Section… drop down
-
-
-
-
-
-
- Click Save
-
-
-
If you found this blog helpful, you can find more content or blogs regarding NetSuite customizations and How-To’s at https://blog.concentrus.com/. If you need any help with customizing reports and saved searches, feel free to contact Concentrus. Our consultants would be happy to guide you through the process.
About Us
Concentrus is a complete NetSuite solutions provider that guides organizations through how to use NetSuite to reach highly focused business goals and objectives. We provide NetSuite implementation, developer, integration, and customization services to ensure that you have a long-term solution that is tailored to fit your systems, people, and processes.
Read About Our Implementation Methodology
Want more NetSuite Tips and Tricks? Check out our Short & 'Suite videos
