
What better way to automate paperwork than to send and receive documents electronically. NetSuite already has the ability to electronically send PDF versions of Sales Order or Purchase Orders or Custom Forms. DocuSign brings another level of automation. Now, with DocuSign, you can efficiently send, track, sign, and save documents for approval, eliminating the back and forth emails or scanning in manual signatures. You can see a quick demo of the SuiteApp in one of our Short N Suite Videos - https://www.youtube.com/watch?v=rPff5VLTgY0.
Here's how it works:
-
-
- Create a DocuSign account.
- Install the bundle in NetSuite. Here is a link to a step by step guide: https://support.docusign.com/s/document-item?language=en_US&rsc_301=&bundleId=hjc1579795546092&topicId=wjq1579795541014.html&_LANG=enus
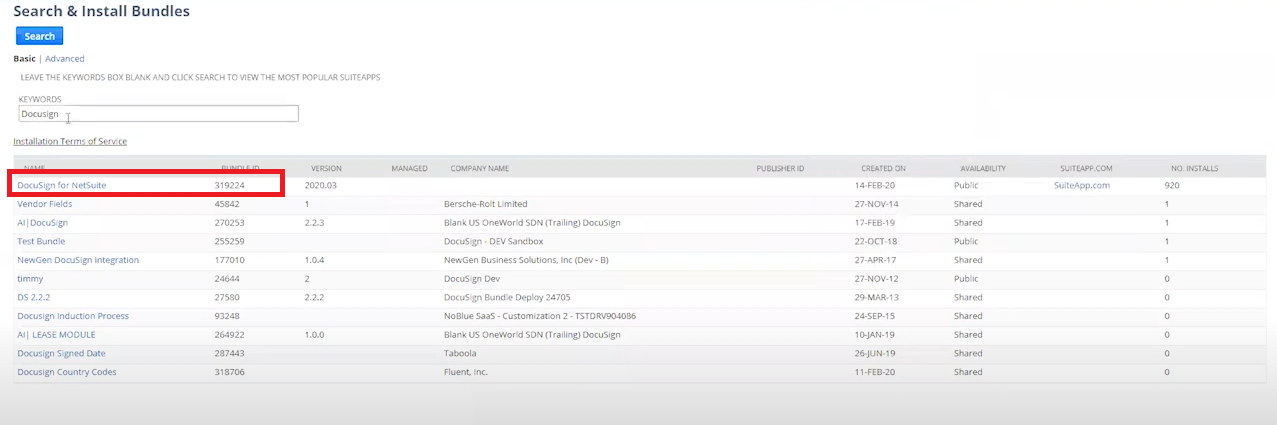
- Once bundle is installed, you will see 2 buttons show up in your UI

-
-
-
-
-
- SIGN WITH DOCUSIGN means you can generate a PDF or pull a file from the file cabinet to sign with your signature.
-
- Click the button
- Select what file you want to sign
- A window will pop up that will allow you to sign, initial, and add other datato the document
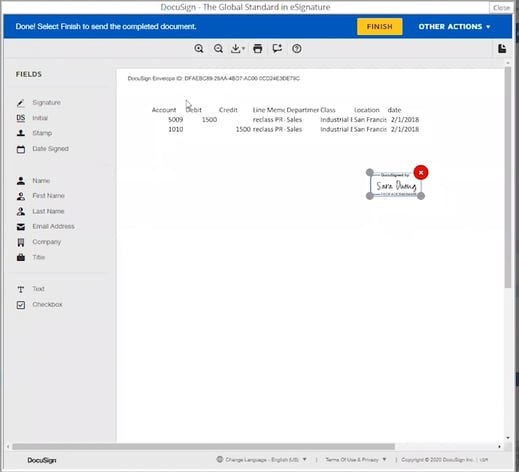
- Once you click Finish, the signed document will be saved to Communications > File on the record you initiated the Sign with DocuSign button
-
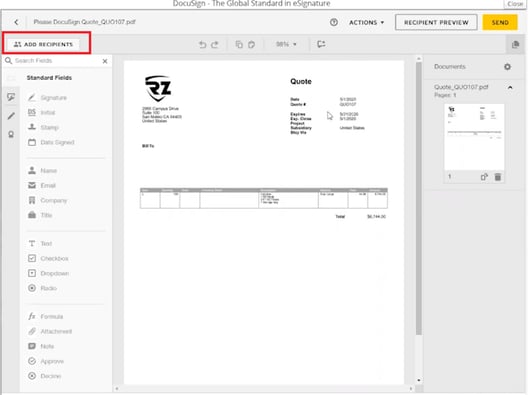
- SEND WITH DOCUSIGN means you can email a document to a recipient for their signature.
-
- Click the button and the DocuSign window pops up with the PDF version of the record you are working from. Here is an example from the Quote record.
-
- The first thing you need to do is Add Recipient.
-
- Once you add recipient, the Standard Fields on the right will be ready for you to drag and drop over to the document. These are the fields you want the recipient to fill out.
- Click Send when all the fields you want are added.
- Check the status of the document by going back to the record and click on the DocuSign tab.
- Click the button and the DocuSign window pops up with the PDF version of the record you are working from. Here is an example from the Quote record.
-
- SIGN WITH DOCUSIGN means you can generate a PDF or pull a file from the file cabinet to sign with your signature.
-
-
-
Please reach out to us if you have any questions. One of our consultants will be happy to walk you through the DocuSign functionalities.
About Us
Concentrus is a complete NetSuite solutions provider that guides organizations through how to use NetSuite to reach highly focused business goals and objectives. We provide NetSuite implementation, developer, integration, and customization services to ensure that you have a long-term solution that is tailored to fit your systems, people, and processes.
Read About Our Implementation Methodology
Want more NetSuite Tips and Tricks? Check out our Short & 'Suite videos
