

Scriptable email templates in NetSuite allow you to harness the capabilities of HTML and FreeMarker code to create highly-customized emails for both internal and external communication. In addition to supporting the display of both standard and custom fields in both the subject line and email body, scriptable templates also support the use of more advanced coding functionality like the insertion of subtemplates, current date/time, and dynamic formatting for multi-select field values. In this blog post, I’ll share the basic steps for setting up a new scriptable email template and provide five of my favorite tricks for making them even more useful.
Setting Up a New Scriptable Email Template
Start by navigating to Documents > Templates > Email Templates > New. At the header level, define a Name, ID, and Description for the template. Also, if you’d like to limit the template’s availability to only a specific record type (i.e. emails generated from customer records), select the record in the Record Type dropdown.

From there, you can begin configuring the content of your email. Enter the Subject (which can include references to NetSuite fields by using the format ${[Record].[Field] – i.e. ${transaction.id}}) and define whether you will be referencing an HTML file uploaded to the File Cabinet or entering your code in the Text Editor for the body content. While both options work the same, I prefer creating my code in an HTML editor outside of NetSuite and pasting it into the source code view of the Text Editor because it allows me to preview the content within the template itself. If you are not comfortable working with HTML, don’t worry! The Text Editor interface has many formatting options built right in, so you can use the graphical interface to make text bold, add images, adjust font faces and sizes, and much more.
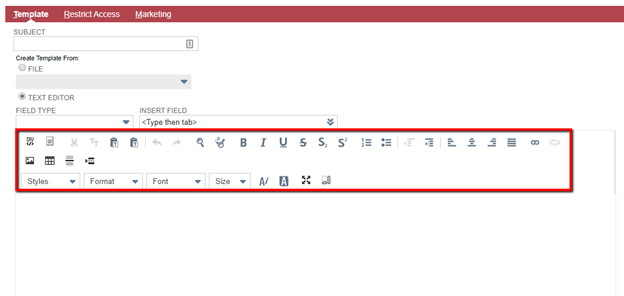
You can also use the “Insert Field” option to pull in the code for fields from the selected record type without needing to look up the correct code structure or field IDs.
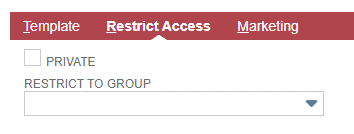
On the Restrict Access subtab, you can control who has access to send emails using this template. You can either make it public by making no restrictions, restricted to a specific group of users, or private to you.
Lastly, you also have the ability to control the addition of an unsubscribe link and company address (both of which are required for marketing communications) as well as the Campaign Domain and Subscription that will be used if the email is part of a marketing campaign. For further information about these settings, see SuiteAnswers.
Now that you’ve configured a basic email template, let’s take a look at just a few of the ways that you can use a little bit of coding knowledge to make it even better.
Five Tricks for Customizing Your Scriptable Templates
- Adding the current date/time into emails
Using scriptable templates, it’s easy to add the current date/time into emails as they are generated.
${.now} displays the date and time using the preferred date/time format in your NetSuite account
${.now?date} displays only the date
${.now?time} displays only the time
- Embedding subtemplates
To save yourself time and make change management between templates easier, you can employ the use of subtemplates to display repeated content across multiple templates. Subtemplates can be referenced either by the File Cabinet file ID or by URL using the following code:
<#include "[File Cabinet File ID]">
<#include "[File URL]">
By using a shared header subtemplate, for example, you could manage changing an image or updating a general email address in a single file instead of having to make the same change across every template that it is displayed within. Let’s imagine that you have a field for product categories that a customer has expressed interest in. If the values “Hardware,” “Software,” and “Peripherals” were all selected on a customer’s record, they would display as follows on a scriptable email template:
Hardware Software Peripherals
Instead of displaying them as a single block of text, you can apply formatting using the following code:
<#assign x = [Field ID of Multi-Select Field]?replace("\n", "[Separating Value]")>${x}
In the “Separating Value” section, you can enter the value that you’d like to have appear between results – for example, “<br />” to add a line break or “ / “ to separate them with a slash.
- Adjusting formatting of multi-select fields
When displaying the values of multi-select fields in scriptable email templates, the native appearance is simply a list of the field values separated by a space.
- Truncating field data
In some cases, it may be necessary to display only an entity or project record’s alphanumeric ID instead of the concatenated “ID + Name” value that is displayed by default. To achieve this, you can use a bit of code within your scriptable template to identify which characters you want to retain:
${[Field ID]?substring(0, 5)}
In the above sample, the first five characters will be retained (as indicated by the “0, 5” text). If your entity ID is eight characters long, you would simply change the “5” to “8” to increase the length of the string. Alternatively, if you wanted to remove the first character and display the 7 characters following it, you would change the text to “1, 8” (indicating to start at the second character and stop at the eighth).
- Pre-loading data into records using URL strings
Of all the tips on this list, this one is my favorite. Let’s say that you are sending a link to a NetSuite-generated survey, form, or record within the body of your email, and you want to set a default value within the form when it loads to reduce manual input by the user and/or eliminate the possibility for user error by forcing specific value to be used. Using scriptable email templates, you can actually append the data that you want to pass into your form onto the URL itself so that when a user clicks the link, the desired information will be preloaded into the form. I’ve used this approach to automatically enter details like the case number and rep name on a support case survey, as well as loading a record in edit mode instead of view mode.
The basic structure is as follows:
<a href="[Link to Form]&[Field ID on Record]=[Default Value]" target="_blank">[Link Text]</a>
Link to Form – This will either be the link to your online form or the transaction record within your NetSuite environment
Field ID on Record – This is the field ID of the field that you want to set a default value for (i.e. support rep or case number)
Default Value – This can either be a hard-coded value (i.e. the internal ID of a specific sales rep) or a dynamic value sourced from the associated record (i.e. the value of the Assigned To field on a case record)
Link Text – This is the text that you want to display for your link in the email body
Here’s how that would look in a practical application:
<a href="https://xxxxxx.extforms.netsuite.com/app/site/crm/externalcustrecordpage.nl?compid= xxxxxx &formid=12&h= xxxxxx &custrecord_ticket_internal=${case.casenumber}&custrecord_assigned_to_internal=${case.assigned}" target="_blank">Click here to provide feedback on your support experience</a>
In the above example, the case number and assignee are being passed into fields on a custom customer service survey record. Since this email would be generated from the case record itself, I’m able to source the information dynamically so that the user completing the survey does not have to fill it out manually.
You can use similar logic to automatically load a record in edit mode using the string “e=T”:
<a href="https:// xxxxxx.app.netsuite.com/app/accounting/transactions/salesord.nl?id=${transaction.id}&e=T&whence=" target="_blank">Click here to provide feedback on your support experience</a>
I hope this post gives you some ideas for ways to use scriptable email templates in NetSuite. Do you want to learn more about creating custom email templates in NetSuite, or get guided support or training? Contact Concentrus today to discuss your email template needs.