
 NetSuite’s saved search function gives you the ability to develop highly-customized reporting in a simple, point-and-click interface. In previous posts, I’ve highlighted some of the more advanced techniques that can be used when creating saved searches within NetSuite, including formulas and SQL statements. In contrast, this article will address one of the easiest-to-use and most powerful features available within saved searches – automated email alerts. With just a few clicks, you can create automated emails that are specifically tailored to the unique processes of your business, all without any coding or development background.
The Basics: Configuring Saved Search Emails
To set up the email preferences on your saved search, start by navigating to the Email tab. This tab contains five sub-tabs that allow you to define various email criteria, including the sender, recipient, subject line, schedule, and more.
At the top of the Email section, there is a series of four checkboxes that defines whether search results will be grouped together (summarized) or sent individually, and indicates whether they will be sent at the time of change/creation or according to a specified schedule.
Settings options include:
- Send Email Alerts When Records are Created/Updated
This setting allows you to send alerts immediately when records first enter the search results or when records that meet the search criteria are edited. Checking this box will trigger individual notices for each record that is created or revised. - Send Emails According to Schedule
This setting specifies that email results will be sent according to the schedule that you define on the Schedule sub-tab, instead of being sent at the time of creation or update. - Summarize Scheduled Emails
This setting is only available once the “Send Emails According to Schedule” option is enabled. Selecting this option will group all search results into a single email that will be sent according to the schedule that you define on the Schedule sub-tab. Leaving this box unchecked will email individual records per the specified schedule. - Send if No Results
This setting controls whether emails are sent if there are no matching search results. Checking this box will trigger an email to be sent at the scheduled time – even if no results are included.
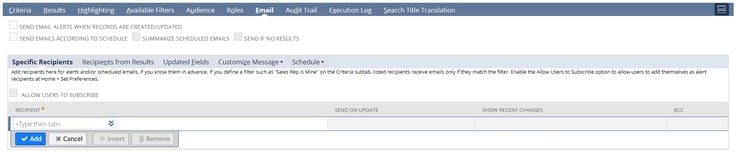
Setting Recipients: Specific Recipients
The first sub-tab in the Email section is the “Specific Recipients” tab. This section is where you identify the specific individuals who you would like to send the email to, along with configuring the preferences for what types of changes trigger that email.
Settings include:
- Allow Users to Subscribe
This setting enables users other than the ones who have been specified as recipients to subscribe to email notifications for this search. By default, this checkbox is deactivated, but it will become available once you have set the search to “Public” and enabled the “Send Email Alerts When Records are Created/Updated” setting. - Recipient
This drop-down field allows you to select from entities within your account, including Employees, Contacts, Customers, Vendors, Partners, and Groups. You may enter multiple specific recipients as separate lines. - Recipient > Send on Update
This setting specifies whether an email should be sent when a change is made to a record included in the results. For example, if you create a search for customers in California and one of the customers changes their email address within NetSuite, an email will be sent to the specified recipient if this box is checked. - Recipient > Show Recent Changes
This setting allows you to display recent changes in the body of email. By default, this checkbox is deactivated, but it will become available once you select the “Send on Update” option. Using the example from above, enabling this feature will include both the original email address and the revised email address side-by-side within the email. - BCC
This text field is where you can manually enter any additional email addresses that you would like to have blind-copied. Since this is a text field and not a drop-down selection, you can enter any email address – not just those that are tied to entities within NetSuite. To add multiple email addresses, separate them with “,” when entering them into the field.
Setting Recipients: Recipients from Results
In addition to setting specific recipients, NetSuite also gives you the option of dynamically selecting the recipients based on search results on the “Recipients from Results” sub-tab. This option is extremely powerful, since it allows you to send notifications directly to sales reps, customers, vendors, or other key points of contacts only when the information pertains to them.
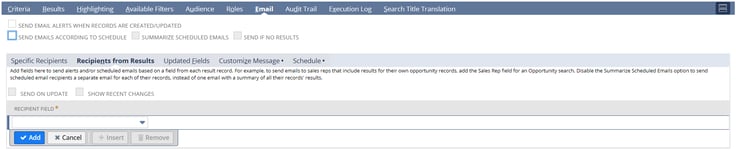
Recipient Field
This drop-down menu designates which field to source the recipient data from, including both standard and custom fields as well as joined records. You may enter multiple recipient fields as separate lines.
As when defining specific recipients, you have the option of sending emails on update and showing recent changes, however these preferences are set for all recipients from results and cannot be defined on an individual line basis.
Sending Emails Based on Updated Fields
In some instances, it is important to notify users that a certain value has been changed (or that a specific new value has been entered). For example, it may be critical for a sales rep to know when one of their customers has had their terms revoked or for a manager to know when an employee’s supervisor has changed. NetSuite empowers you to automate notifications in cases like these using the “Updated Fields” sub-tab.

- Field
This drop-down menu is where you designate which field you would like to review for updates. Both standard and custom fields are available for selection, however you are limited only to fields that display on the type of record that matches your search (i.e. only customer fields are available on a customer saved search). You may enter multiple fields as separate lines. - Field > When Old Value Is…
This optional text field allows you to set the starting field value as a trigger for an email notification. For example, if you want to send an email only when a Lead’s Status is changed AND the original value was LEAD – Unqualified, you would enter “Status” as the Field value and “LEAD – Unqualified” in the “When Old Value Is…” section. - Field > When New Value Is…
This optional text field allows you to set the new field value as a trigger for an email notification. Following the example from above, if you want to send an email only when a Lead’s Status is changed AND the new value was CUSTOMER - Won, you would enter “Status” as the Field value and “CUSTOMER – Closed Won” in the “When New Value Is…” section.
For even more granularity, you can enter values in both “When Old Value Is…” and “When New Value Is…” to limit notifications to instances where both values match the entered text. Because these fields are text fields, it is important that the text that is entered matches the values of any drop-down fields exactly, otherwise the results will not be emailed as expected.
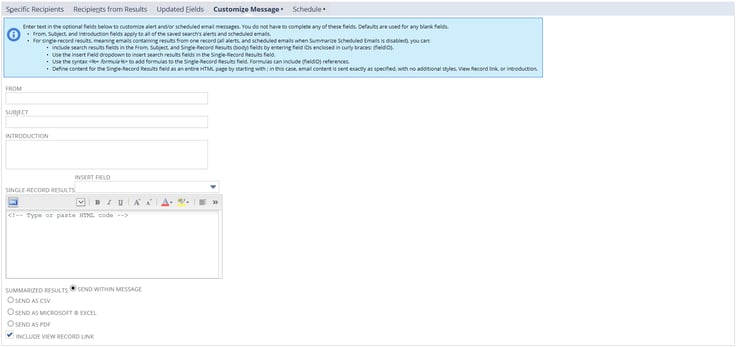
Customizing the Email Message
Once you’ve defined the criteria for triggering email notifications and specified the recipients, you have the option of customizing the content of your message on the “Customize Message” sub-tab. Many fields in this section support the use of NetSuite tags, which allow you to dynamically populate the message with values from the search results. All message fields are optional; if you do not enter custom information into the fields, default values will be used when the system generates the email.
Message fields include:
- From
This text field allows you to enter a custom sender address. To enter an address in this field, use the following format:
“name” <email address>
If this field is left blank, then emails will be sent from the search owner’s email address, as defined in the Email field on their employee record. If a search owner is not defined or their Email field is blank, then emails will be sent from the email address specified in the Return Email Address field at Setup > Company > Company Information.
- Subject
This text field is where you define the subject line of the email notifications. When sending single-record emails, this field can be populated with values from search results by entering field IDs enclosed in curly braces. For example:
Terms Added for Customer {altname}
**Note: To find the field ID, first ensure that you have enabled Set Preferences > Show Internal IDs. Once this box is checked, click on the field name of the desired field and the field ID will be displayed in the bottom right corner.
- Introduction
The contents of this text field will appear before search results. - Single-Record Results
This text field defines the text that will be included in emails that contain a single record as a result. Using the same format shown in the “Subject” section above, you can add values from the search result into this field. You can also use the “Insert Field” drop-down to automatically add field IDs in the proper format. - Summarize Results
This selection indicates the format in which results will be included as part of the email. You can select “Send Within Message” to display the results as text within the body of the message, “Send as CSV” to attach results as a CSV file, “Send as Microsoft Excel” to attach results as an Excel file, or “Send as PDF” to attach results as a PDF file. - Include View Record Link
This checkbox determines whether a link to the corresponding record in NetSuite is included alongside search results. Checking this box will add an additional column with a link to the record to the email.
Scheduling Emails
If the “Send Emails According the Schedule” preference is selected, you can define the schedule for email notifications on the “Schedule” sub-tab.
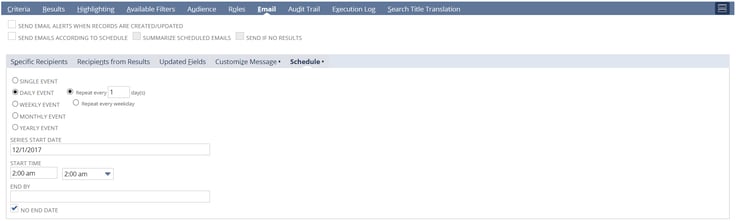
Scheduling preferences can be set by:
- Single Event
This option will trigger the email notification one time, per the date and time configured in “Series Start Date” and “Start Time” (see below). - Daily Event
This option will trigger the email notification to either repeat every __ days (defined by user) or to repeat every weekday. - Weekly Event
This option will trigger the email notification to repeat every __ weeks (defined by user) on the specified day of the week. - Monthly Event
This option will trigger the email notification to repeat on the __ day of every __ month(s) (defined by user) OR on the first/second/third/fourth/last [day of the week] of every __ month(s) (defined by user). - Yearly Event
This option will trigger the email notification to send on a specific date OR on the first/second/third/fourth/last [day of the week] of [month] (defined by user). - Series Start Date
This field contains the date that email notifications will start being sent. Today’s date is entered by default. - Start Time
This is a drop-down field that defines the time of day that the search is run and email results are sent. - End By
This field indicates the date that search result emails will stop being sent. This is not a required field; if no end date is needed, use the No End Date checkbox (see below). - No End Date
This checkbox indicates that there is no end date for the email notifications.
What does all this mean?
One of the most effective ways to improve employee efficiency is to automate repetitive processes. Using a saved search email alert to perform actions like notifying customers of back-orders, updating sales reps on their accounts, or prompting accounting staff to review certain transactions saves time, and frees staff members up to perform more critical tasks. Plus, when you combine email alerts with more advanced techniques like formulas and SQL statements, the potential for automation is practically unlimited.
If you are still running into issues, we can help! Our team offers a variety of training and support packages to help you get the most out of your NetSuite investment.

