

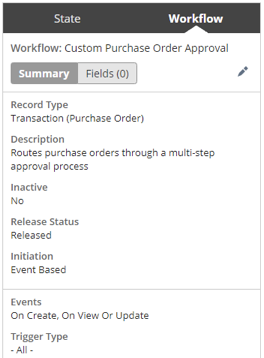
In previous posts, I’ve shown how simple, single-state workflows can be used to automate actions like sending emails and setting default field values. In this post, we’ll build upon those basic skills and create a multi-state approval workflow that will guide a transaction through a series of review and approval steps. While I’ll be using a purchase order in my demonstration, this same logic can be applied to practically any transaction type within NetSuite, you may need to add some custom fields if you are adding an approval process onto a record that doesn’t typically support approvals (such as a quote).
Setting Up the Workflow
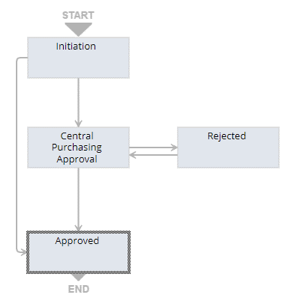
Our workflow is going to have four steps (or “states” in SuiteFlow terminology):
- Initiation
This state defines the initial field values that will be required for our approval workflow and prevents users from editing those fields. It also adds a “Submit for Approval” button that allows users to send their unapproved purchase order to the purchasing department for review. - Central Purchasing Approval
This state adds “Approve” and “Reject” buttons for users with the 19: Central Purchasing – HQ role and locks the record to all other users. - Rejected
This state triggers an email to the person who submitted the purchase order for approval to tell them that the transaction has been rejected. It also sets the “Approval Status” value to “Rejected,” locks the record to all other users, and makes the “Notes” field required. - Approved
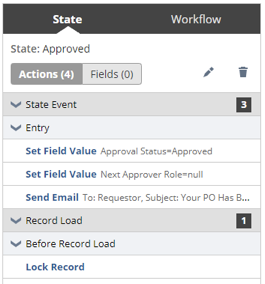
This is the final state, which triggers an email to the person who submitted the purchase order to tell them that the transaction has been approved, sets the “Approval Status” value to “Approved,” and locks the record to all users except those in the Administrator or 19: Central Purchasing – HQ roles.
While all of these actions may sound complicated, this workflow is actually fairly simple to configure. Let’s start with the first state – Initiation. Here are the actions that are occurring in the Initiation state:
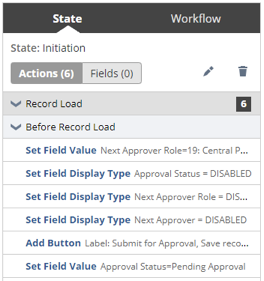
All are being triggered on Before Record Load. There are two “Set Field Value” actions – one that sets the “Next Approver Role” value to 19: Central Purchasing – HQ and another that sets the “Approval Status” to “Pending Approval.” The next three actions set the “Approval Status,” “Next Approver Role,” and “Next Approver” fields to disabled, so that the user cannot manually override any of these values when entering a new purchase order. Finally, an “Add Button” action creates a “Submit for Approval” record when Requestor = Current User:
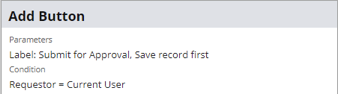
This condition ensures that only the person who requested the purchase order is able to submit it for approval.
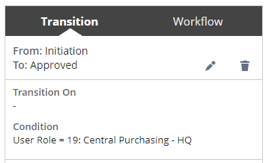
The first transition is set to execute when the Submit for Approval button is clicked:
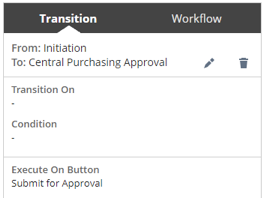
When this button is clicked, the record enters the Central Purchasing Approval state, which performs a few actions:
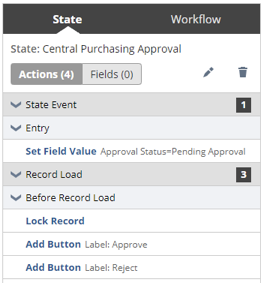
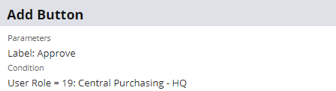
On entry, the “Approval Status” is set to “Pending Approval.” You’ll notice that this is essentially a duplicate of a “Set Field Value” action that was performed in the Initiation state. This will come into play when we discuss our “Rejected” state momentarily. The other three actions performed at this time are to lock the record for all users not using the 19: Central Purchasing – HQ role and to add “Approve” and “Reject” buttons for users with the 19: Central Purchasing – HQ role only:

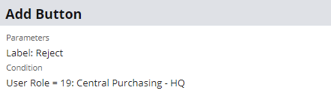
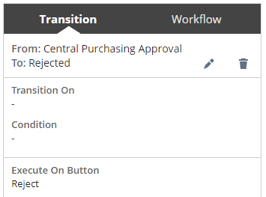
At this point, we have two transitions that trigger depending on which button the user clicks. If “Reject” is clicked, then the record is routed to the Rejected state:
In the Rejected state, several distinct actions are performed:
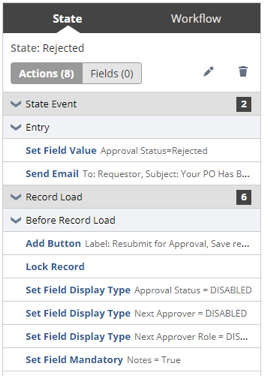
The “Approval Status” is changed to “Rejected” and an email is sent to the requestor to let them know that their purchase order has been rejected. Additionally, a “Resubmit for Approval” button is added only for the requestor that will allow them to send the transaction back to purchasing for review and approval. As in the Initiation state, we also lock the record to other users and disable the ability to edit “Approval Status,” “Next Approver,” or “Next Approver” fields. As part of the resubmission process, we also make the “Notes” field mandatory so that the user can indicate what changes have been made or provide more details to the purchasing department that will aid in their review.

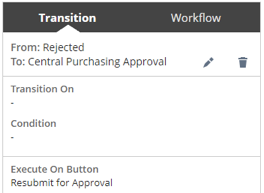
When “Resubmit for Approval” is clicked, the record transitions back to the Central Purchasing Approval state:
At this point, the “Approval Status” will be set back to “Pending Approval.” If the user clicks the “Approve” button, at this point, the record is transitioned to the Approved state: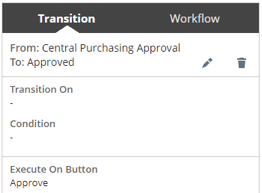
In the Approved state, the “Approval Status” value is changed to “Approved” and the “Next Approver Role” field is blanked out. We also trigger an email to the requestor to let them know that their purchase order has been approved and lock the record to all users except those with the Administrator or 19: Central Purchasing – HQ roles:
I’ve also added one final transition that will allow purchase orders entered by users with the 19: Central Purchasing – HQ role to bypass the approval process:
The Purchase Order Approval Workflow in Action
Now that you’ve seen how to configure this workflow, let’s take a look at how it functions by entering a new purchase order and walking through the entire approval process:
Once you’ve experimented with the basic steps, you can easily build out a very complex, multi-state approval workflow without the need for any scripting or custom development. You can even use granular criteria like total price or vendor name to define the rules for routing transactions for approval. SuiteFlow makes it easy to match your approval routing to your business process, allowing your organization to strike the ideal balance between control and automation.
For more information about this or any other NetSuite How To, click on the button below to contact us.