

When looking for ways to optimize your business operations, it is tempting to focus on “big wins” – the changes that will yield time savings in the minutes or hours. However, it can be just as fruitful, if not more so, to find ways to save a few seconds on repetitive tasks that are performed hundreds of times each day by multiple employees.
For example, saving one hour on a task that is completed weekly will yield an overall savings of 52 hours per year (3,120 minutes). Compare that figure to saving 10 seconds on a task that is performed 25 times per day by three different staff members; this seemingly small optimization yields a total savings of more than 54 hours per year (3,250 minutes).
One of the easiest ways to save time on frequently-performed tasks is by pre-populating required fields based on data that is either entered by the user or is already present in another related record within NetSuite. Examples of this include setting values on a sales order based on the Lead Source, updating fields on a support ticket based on the customer record, or sourcing information from the user to populate data on a custom record. SuiteFlow, one of NetSuite's standard features, allows users to create powerful automations like these in a matter of minutes without the help of a developer.
What is SuiteFlow?
SuiteFlow is a user-friendly interface for creating and executing business process automations – referred to as “workflows” – within NetSuite. These workflows can be applied to both standard and custom record types and can include a wide variety of actions, such as making fields mandatory, triggering automated emails, adding or removing buttons, and setting field values.
While workflows can be extremely complex with multiple states and transitions, the simple automations that I’ll focusing on in this post include only one level.
Sample Scenario
The Customer Service Manager wants to increase the efficiency of her support team, particularly with regards to the support tickets that they are assigned. Many of the fields that are required on the support ticket form are manually set and are correlated to the values entered in other fields. For example, when the origin of the ticket was an email, reps manually check a box to indicate that email is the preferred method of communication for updates on this ticket.
She also wants to be able to do more in-depth reporting on support tickets by adding custom fields to house data like the customer’s industry, the name of the rep who completed the ticket, and the date of the customer’s last order, but doesn’t want to add any additional time to the data entry process.
The Solution
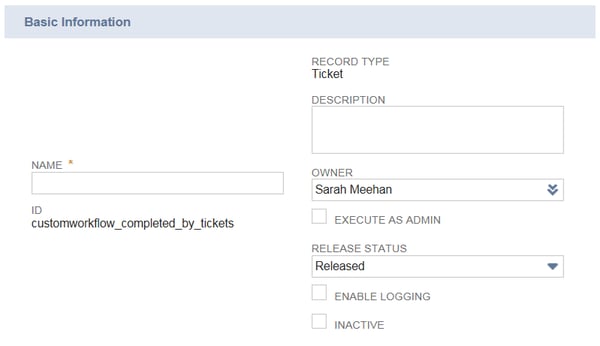
Navigate to Customization > Workflow > Workflows > New to access the SuiteFlow interface.
Much like the saved search feature that I’ve discussed in previous posts, workflows are tied to a specific record type and can only be used to configure changes on that selected record type. In this case, we’ll be making changes to the ticket record. Once you have selected the workflow record type, it cannot be changed, so it is important to make sure that you select the correct record when initially creating your workflow.
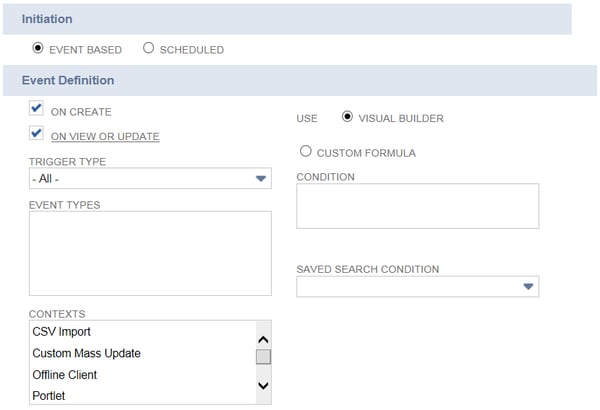
Workflows can be configured to run according to a schedule or based on user-defined criteria being met (referred to as “Event Based” initiation). For this scenario, we’ll be using event-based initiation since we want the changes to occur as the user edits the ticket record. Additionally, we’ll allow the workflow to trigger both when a new ticket is created and when an existing ticket is updated using the “On Create” and “On View or Update” preferences.
Once the high-level settings on the workflow have been configured, we can begin defining the specific actions that we want the workflow to execute. As I mentioned earlier, we’ll keep this workflow simple and work within a single state without any transitions.
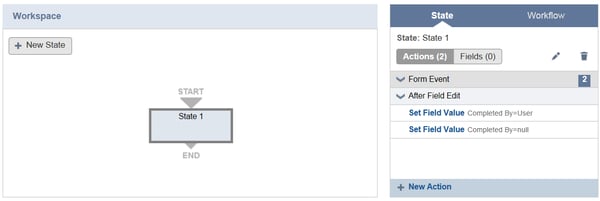
To begin adding actions, click the “New Action” button on the bottom right corner of the screen. A dialogue box will be displayed, allowing you to define what type of action the workflow will be performing. For the purpose of this scenario, we’ll only be using the “Set Field Value” action. The first trigger that we will use to initiate this workflow “After Field Edit” trigger, which will cause fields to be populated as the user edits other fields.
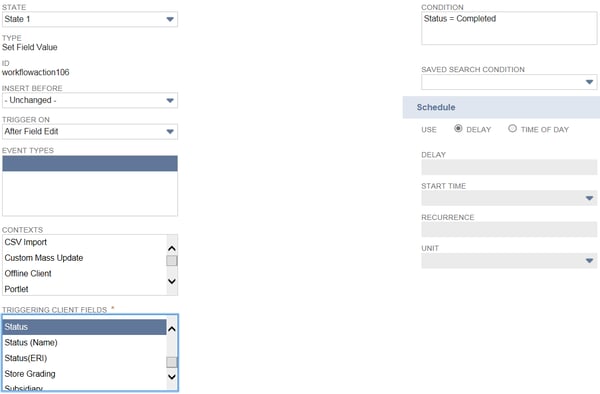
We’ll start by defining the “Triggering Client Fields” value, which is where we identify which fields we want the workflow to watch for edits. In this case, we want to set the value of a custom field called “Completed By” to match the name of the user who changes the value of the “Status” field to “Completed.” The “Status” field is what will drive the automation, so that is the value that we’ll select in the “Triggering Client Fields” menu. Additionally, we only want the workflow to initiate if someone selects the “Completed” status, so we will define that as our condition.
Next, we’ll specify which field’s value will be set and the contents of that field. Select “Completed By” as the field, then choose the “User” field from the “Current Record” record to populate that field with the name of the current user, as shown in the screenshot below.

To make this automation even more intelligent, we’ll also configure the reverse logic, which will clear the value of the “Completed By” field if someone changes the “Status” to any value other than “Completed.” This is achieved by creating a second action with the same criteria, changing the condition to “Status ≠ Completed” and setting the value for the “Completed By” field to a formula of “null” (entered without the quotation marks).
Other field values can be set using the exact same process but with different defined logic, such as setting the date of completion when the “Status” is change to “Completed,” setting the ticket priority based on the ticket origin, or setting the assignee using the ticket priority as a reference. This technique can be applied to any record type using logic that is relevant to your business processes, making it a powerful tool in streamlining repetitive tasks in any organization.
Stay tuned for part 2, where we’ll use joins to pre-populate data sourced from other records into our ticket and review a few helpful tips and leading practices for creating workflows.
In the meantime, if you have any questions about setting up workflows with SuiteFlow, feel free to contact us and one of our team members would be happy to walk you through it.