

The Inbound Shipment feature allows companies to track items from one or more purchase orders as they are in transit and streamlines the receiving and billing processes for these shipments. Best of all, it takes only minutes to implement and can be enabled free of charge. In this post, I’ll provide an overview of the Inbound Shipment feature to show how it can make a difference in your business.
Enabling Inbound Shipments
To enable Inbound Shipments, navigate to Setup > Company > Enable Features > Transactions and check the “Inbound Shipment Management” checkbox. Note: There are a few prerequisites to enable this feature, which are listed below.
Setup > Company > Enable Features > Company:
- Multiple Currencies
Setup > Company > Enable Features > Transactions:
- Purchase Orders
- Advanced Receiving
Setup > Company > Enable Features > Items & Inventory:
- Advanced Bin/Numbered Inventory Management
- Advanced Inventory Management
- Landed Cost
Creating an Inbound Shipment
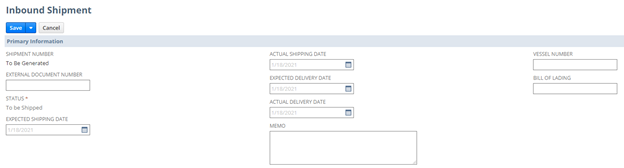
Once Inbound Shipment Management has been enabled, you can create an inbound shipment record by navigating to Transactions > Purchases > Create Inbound Shipment. Complete the header fields to track shipping and delivery dates as well as Vessel Number/Bill of Lading:
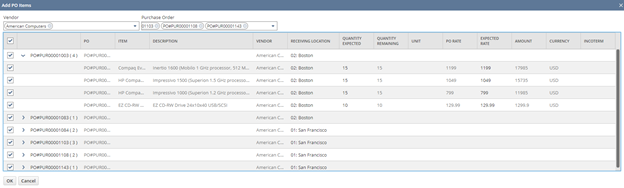
Next, select the purchase order(s) and item(s) on the Items subtab. If you are entering a small number of items, you can select them directly as individual lines. For larger shipments, click the “Add PO Items” button to use a bulk entry UI for adding multiple items at once:
Click “Save” to create the inbound shipment. Alternatively, organizations managing a large number of inbound shipments can import them from CSV files. More detailed information regarding importing inbound shipments is available in SuiteAnswers.
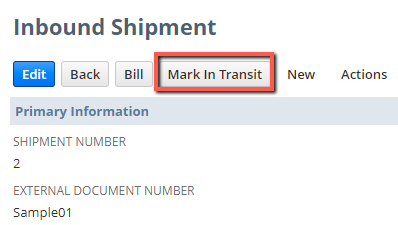
Inbound shipments are initially created in the “To Be Shipped” status, which allows you to create them as soon as you receive information on the contents of a shipment even if it is not scheduled to begin transit for days (or even weeks). Once a shipment leaves the vendor en route to your warehouse, click “Mark in Transit” button:
Once a shipment reaches an In Transit status, additional buttons labelled “Receive” and “Take Ownership” become available:
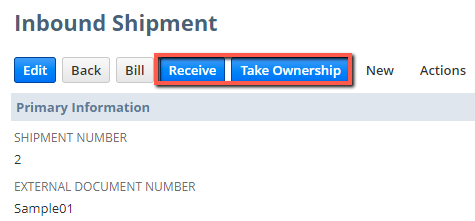
By having separate buttons for physical receipt and taking ownership, you can claim the inventory that is listed on the inbound shipment as an asset separately from actually receiving it. Depending on the incoterms that you have set with your vendors, you may take ownership of a product only at the time that it arrives at your warehouse or it may be considered an inventory asset at the moment it leaves your vendor’s warehouse. Inbound shipments support taking ownership of items at any point during the transit process. Note: If you are taking ownership upon receipt, you do not need to perform separate steps for taking ownership and receiving. The single step of receiving inventory will impact the product’s physical quantity and asset value in this case.
Receiving Inbound Shipments
Once a shipment has arrived to your warehouse, open the corresponding Inbound Shipment record and click the “Receive” button. This will load an interface that allows you to receive inventory from one or more purchase orders associated with the inbound shipment:
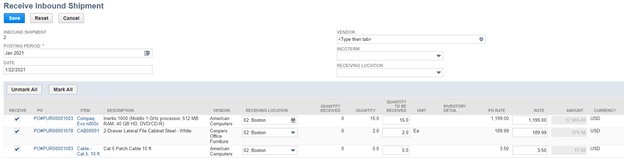
As with the standard item receipt record, you can opt to only receive select lines and/or change the receiving quantities during this step. Upon saving, the system will automatically create individual item receipt records for each purchase order, grouping together all line items from the same order onto a single item receipt. At this point, the inventory will become available in the receiving location.
Billing Inbound Shipments
Much like the receiving process for inbound shipments, the billing process utilizes a simplified interface for billing multiple orders associated with a single shipment in one easy step. Once the bill is received, click the bill button on the inbound shipment record.
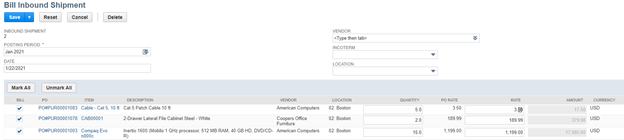
Select the items and adjust quantities/pricing on the line items as needed. Upon save, the system will separate the bills by vendor and generate distinct bill records for each. Following completion of the billing operation, you can then edit the bills to enter the vendor-provided reference numbers.
The native Inbound Shipment Management functionality is easy to configure, easy to use, and free to implement. In addition to the basic flow that I’ve outlined above, it also supports CSV import of inbound shipment records as well as landed costs. If your organization has been struggling to track inbound shipments or using a custom solution to do so, then the Inbound Shipment Management feature is worth considering.
Do you have questions about setting up Inbound Shipment Management in your NetSuite instance? Contact Concentrus today to discuss your needs with one of our NetSuite experts.

About Us
Concentrus is a complete NetSuite solutions provider that guides organizations through how to use NetSuite to reach highly focused business goals and objectives. We provide NetSuite implementation, developer, integration, and customization services to ensure that you have a long-term solution that is tailored to fit your systems, people, and processes.
Read About Our Implementation Methodology
Want more NetSuite Tips and Tricks? Check out our Short & 'Suite videos
