![]()
 One of my favorite features of NetSuite is the way that it tracks bidirectional email activity for emails generated from within the system. Having visibility into communication activity related to a customer, vendor, or specific transaction record is an invaluable resource, but only if the initial outbound email is delivered as intended. NetSuite offers the ability to configure DKIM (DomainKeys Identified Mail), which is essentially a digital signature within the code of your email that can be read by internet service providers to help identify spam and improve the deliverability of your messages. While there are some slightly technical aspects of setting up a DKIM entry, even a non-technical user can do it once they understand the process. In this post, I’ll take the mystery out of configuring DKIM in your NetSuite environment.
To access the DKIM configuration interface, navigate to Setup > Company > Email Preferences > Domain Keys:

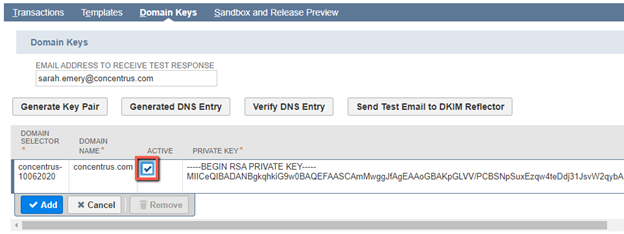
Start by entering a value in the Domain Selector field. This can be any value at all, with a few limitations:
-
- This value can be no more than 63 characters
- Only letters, numbers, and hyphens may be used
- The first character must be a letter
- The last character must be a letter or number
As a best practice, it is recommended that you use a combination of the date and the organization name (i.e. concentrus-10062020).
Next, enter the Domain Name that will be used to send email out of NetSuite, excluding the prefix (i.e. concentrus.com). If you have multiple subsidiaries with distinct domain names, you will need to set up a DKIM entry for each.
Once both the Domain Selector and Domain Name values are populated, ensure that the line is still selected and click the “Generate Key Pair” button. This will automatically populate the Private Key and Public Key values. After the system has generated data for both fields, click the “Generated DNS Entry” field. This will load a pop-up with the string that you will need to copy to complete the next step:

To set up the DKIM entry, you will need to create a TXT record with your DNS (domain name system) provider. The person who manages your website should be able to help you with this is you are not familiar with this process. The TXT record will have the following structure:
Name:
[Domain Selector]._domainkey
(i.e. concentrus-10062020._domainkey)
Value:
[Text copied from Generated DNS Entry pop-up]
The TXT record will take some time to be published (usually within an hour, though occasionally longer). Once live, NetSuite will be able to ping your DNS to verify that this record exists and confirm that your organization owns this domain.
After the TXT record has been added and published, you will need to return to NetSuite to complete the final steps. On the Domain Keys UI, click the line that you are ready to finalize and click the “Verify DNS Entry” button. A pop-up window will indicate if the verification is successful. After you have successfully verified the entry, click the “Active” checkbox on the line and save.

You can return to this page to generate a test email by clicking the “Send Test Email to DKIM Reflector” button. The test email contains a lot of code and technical information, but it will indicate whether or not the DKIM entry is readable by your ISP.
At this point, your DKIM configuration is completed and any emails generated out of NetSuite by the listed domain will be digitally signed and should have better overall deliverability. Once you’ve completed this process, there is not any ongoing maintenance aside from adding entries for any new domain names.
Do you have questions about email deliverability or need assistance configuring your DKIM in NetSuite? Contact Concentrus today to discuss your needs with one of our NetSuite experts.
About Us
Concentrus is a complete NetSuite solutions provider that guides organizations through how to use NetSuite to reach highly focused business goals and objectives. We provide NetSuite implementation, developer, integration, and customization services to ensure that you have a long-term solution that is tailored to fit your systems, people, and processes.
Read About Our Implementation Methodology
Want more NetSuite Tips and Tricks? Check out our Short & 'Suite videos


